
HOW TO BUILD A TINY HOUSE IN A WEEK
I love tiny houses. I love the simplicity and the creative use of small space. I love minimalism and living simple. So I was checking plans, watching videos, photos and researching the whole tiny-house movement that has been now stronger than ever. I knew I wanted to build my own one day and I started to talk to friends about it. But I never expected that it would happen so soon. We literally talked about it for maybe a month and after my friend´s dad (Darko) got into the project and made the first sketch of the tiny house, we knew we have to do this and we have to do it before the summer.
So all this happened last May and I really wanted to share this with you, because it´s still one of the most amazing experiences and the best thing we ever build with my friends.
Planing
We started calculating the costs, figuring out where would be best to buy all the material, which material is best to use, trying to figure out transport options, electricity (since there is none on the location) and everything else. While we were convinced we can do this, Darko was probably going through hell when he realized he has to work with girls for next 10 days. But he was brave, we were determined and the material was ordered.

This was our first plan of the tiny house.
Wood delivery
We spent first 2 days in my friend’s weekend house, where all the wood was delivered too. And yes it was raining like crazy which made the wood soaked and a lot heavier, and yes Ana and me were in this all alone. We spent the day moving the wood under the roof and checking if everything is there and if it´s the right length.
If we would have more time, we could definitely find some good 2nd hand wood or leftovers, so the whole tiny house would be cheaper (same goes for windows), but we really didn´t have much time, so we decided to order the wood from the local company.
Wood: checked!


Painting and packing
Sun came out and we spent the whole day painting the wood. We didn´t have enough time to prepare all the wood, so we had to leave that part to be done on location.
We also jumped to a hardware store and got 2 windows and a balcony door. Since we had to carefully calculate how much all the material will weight so the van is still kinda legal, I was allowed to take only 2 windows. We also had a whole shopping list for screws, nails, rolls of mineral wool, rolls of hydro-paper, paint, brushes, gloves, drill bits,… now just imagine us girls in the hardware store trying to buy all this. I guess we looked a bit confused and out of place to most of the staff there, so we went this conversation in every department “What do you need this for girls?” … “Well, we are building a house next week so we need …..” That sure left them even more confused and probably scared for us.
After packing everything our van was literally half empty, but the weight was pretty much pushing the limits. Due to overload we had to skip the OSB-boards and the plan was to buy them on the island.
Material, transport, friends: checked!

Travelling
This is our amazing duo, big Ante that drove the van for us and small/big boss Darko – the brain behind this operation.

We were travelling with 2 cars, one for all the tools (+3 people) and the van for heavy material (wood, windows, doors, roof).
Day 1 – Time to get dusty

For first two days we had some man power. We were 3 girls and 3 boys/men. And while the guys were measuring and planning, Ana and me had fun with all the wood. Since we didn’t grind it or paint it before we left, this was our job for that day.

So on our first day we build the wooden frame and nailed OSB-boards for the house floor. On top of that we nailed in hydro insulation.

The frame is 5 x 4 m and the actual living space is 3 x 4 m + 2 x 4m terrace.
Day 2
Now it was time to put on the frame of the house and make sure it´s all stable, straight and looking good (very professional description I know). Since we planned a day before that one window and door would be on the front side and one window on the left side of the house, we had to figure out where the support is needed, so where all the headers go. We let that part to Darko, just because he really likes to do that.

Day 3
Girls arrived that and the boys left one day before. So from now on Darko was left alone with 5 girls. It was time to start building the roof and I think we did a pretty good job.


Day 4 -Roooooooof
The roof is build from OSB-boards + hydro-isolation + mineral wool + our lightest but strongest member – Sandra (dancing on the roof). Putting the roof up was not easy, but everything is possible with a good plan and 5 strong girls.

I think by this point Darko was pretty impressed with our skills, determination and also strength. 🙂


Day 5 – Windows & Door

Next thing on the list was to install windows and a door, plus to fix all the holders for the walls and get everything ready for the next day.
Day 6 – Walls

After our morning class “how to build walls from hardwood floor boards”, we were ready to go. I have to point out that we bought 2nd class boards, so not all of them fit perfectly. Some cutting, planing, twisting, pushing and we had the walls up.

At this point was already in love with it and ready to move in!
Day 7 – Fail
So since we didn´t bring OSB-boards with us, we ordered them from a local hardware store. And they came the next day – too short. We didn´t have time to wait for new boards to arrive so that’s where the fun with the wrong-sized OSB boards started. And since we didn´t get them in the size that would fit almost vertically from floor to the roof, I had to play Tetris for a while.
The girls also left that day, so Darko, Ana and me were left to do some finishing touches and celebrate.

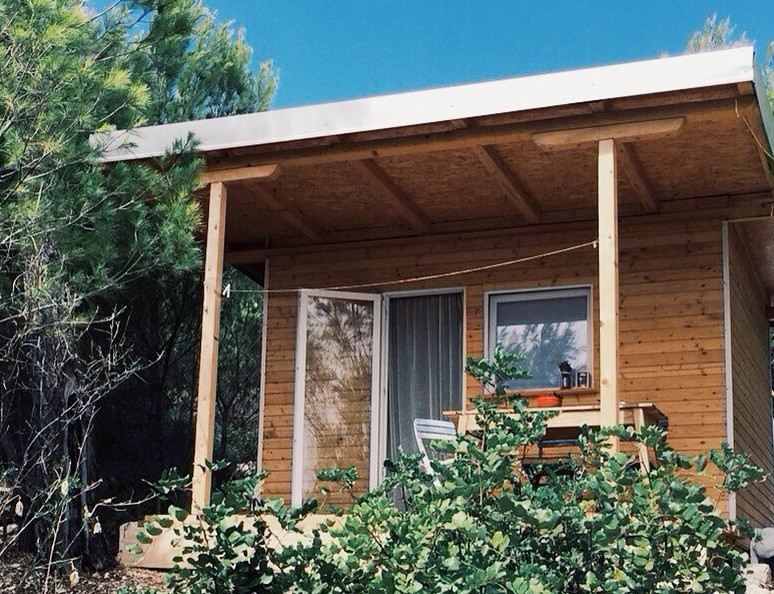
If you are wondering why the floor boards are not fixed, is because we left them to dry over winter. This summer/fall we will grind them and fixed them properly. And than we can also have some fun with the interior.


I couldn´t be happier and more proud that we did this in just 10 days, basically 7 days of building. Every day we would wake up at 7am, eat a lot and drink loads of coffee and work until the sun-powered electricity would last, so around 7pm. Of course, every day we would have 1h lunch & coffee break. But to save time 2 volunteers would prepare lunch for us, while others continued working. On the end, it´s safe to say we worked around 10h/day.
It will definitely be something we will all remember forever and we can always say:
“We build a tiny house together in a week!”

Price
If you are interested in the costs of the house I summed it up for you. Like I said the wood could be a lot cheaper if we would buy OSB-boards up north or also just skip them or use the same hardwood on the inside. I was also trying to get used doors or windows, but it got complicated and we decided, we really wanted to make it proper and make sure it lasts as long as possible. The wind gets really strong there is the winter, so the conditions are tough.
So here it is:
- All material (wood, metal poles, paint, 1000 screws, nails, boards, wool, hydro-paper, …) : around 1800€
- Windows, door: around 400€
- Roof: around 300€
- Total: around 2500 €
- + Transport (costs for 2 cars and rent-a-van from a friend) around 300€
- + Costs for food and some stuff that was missing for the house like sink, shelves,… around 200€
- Experience: Priceless !

Just a few months after I was checking Cabin love Instagram account for ideas, my tiny house was now among them. Hopefully, it will inspire somebody else to build one as well. On the end all you need some friends that are crazy enough to do this with you!
Now I olny wish it would have wheels so I can move it to the mountains when I feel like it.
Thank you!

Leave a Reply